Showing posts with label alcohol markers. Show all posts

Wednesday, November 2, 2022

Paper Funday Fun!

Hi Paper Funday friends! It's November and one of our generous sponsors this month is Sweet November Stamps. I choose this cute little guy swinging on a candy cane called Sweet November Vault - Jolly Elf.
I made a card and 4 tags and honestly have 12 more tags to finish!
All images were printed on our HP Inkjet printer. The coloring was all done with alcohol makers. I have a mix of Copics, Spectrum Noirs and Altenew's markers. I just look for the color I want and the brush nib.
Tags are  made with Mama Elephant - Two Scallop Frames, Pretty Pink Posh Scallop Square Tags and Right at Home Folded Gift Tag Die Set (retired). A few small jingle bells from a Pretty Pink Posh were tied on to the tags above.
Here are the back of the tags:
Thanks so much for joining us at The Paper Funday Challenges...Remember Anything Goes!
*Some of the links in this post are affiliate links. This means if you click on the link and purchase the item, I will receive a small affiliate commission at no extra cost to you. All opinions remain my own.

Tuesday, November 30, 2021

Winnie Tags

Hi friends! Welcome to Polkadoodles' DigiChoosDay where you can receive a discount, enter a challenge and purchase some cute cute digital images.
I printed on my laser printer the image called Lantern - Digital Stamp Download - Winnie White Christmas Printables. I love this image and have used it many times this Christmas season.
I used alcohol markers to color in the images, silver metallic pen and glitter markers for details.
The sentiment "Happy Christmas" is from Polkadoodles' Christmas Joy Digiscrap Download Bundle. I particularly love this font and sentiment.
I cut 3 different sizes with tag dies from my stash:
Now I have some beautiful tags for gifts this year. I really fun, inexpensive way to produce multiple tags!
*Some of the links in this post are affiliate links. This means if you click on the link and purchase the item, I will receive a small affiliate commission at no extra cost to you. All opinions remain my own.


Wednesday, May 20, 2020

SugarPea Mix It Up Slimline Card

Hello friends! Another month has rolled around and another creative challenge from SugarPea Designs:
These mix-it up challenges are fun for you can use the image, the colors, the sketch or all 3!
I did a combination of the colors and some of the sketch for this slimline card using the Strike Up the Band stamp set:
Slimline cards are so easy to make and they fit into a standard #10 envelope (business size). My overall card measures 9 1/2" X 4". Cut from an 8 1/2" X 11" sheet of Neenah Classic Crest 110# card stock. I cut it 9 1/2" long and 8" wide. Scored at 4". The scene was cut from Bristol Smooth card stock 3" X 9" which left a nice white border all around. 
The scene path, clouds and banner were made with Trinity Stamps Slimline Card Series. There are so many options now with the longer dies, but I thought a colorful path would be fun.  All the images were colored with Altenew Alcohol "Artist" Markers. The path and sky were created by ink blending Distress Ink - Blueprint Sketch and Twisted Citron. Really bright and vibrant!
I used the "Happy Birthday" from the Jukebox Jive SugarPea set on the inside with one more fun little guy hanging onto a balloon! I have some colorful envelopes in my stash from Trinity Stamps for these slimline cards and chose one to coordinate. No extra postage required!

If you haven't tried making a slimline card - give it a go. Scenes are fun to create when you have a lot of real estate!

*Some of the links in this post are affiliate links. This means if you click on the link and purchase the item, I will receive a small affiliate commission at no extra cost to you. All opinions remain my own.

Thursday, November 21, 2019

Hero Arts Fluffy Stockings for CAS Christmas Card Challenge

 
Hi friends! Welcome to my blog post for CAS Christmas Card November 2019: Warm and Cozy. Puppies and kittens! What is warmer and cozier than that?
This is CAS's last challenge for 2019. They are taking a break until January. I have had this Hero Arts, Fluffy Stockings Stamp & Cut set in my stash since last year. I finally got a chance to use it and I plan to use it a lot more!. They are so darling, these little guys.

To make this card, I simple stamped the images onto Neenah 110 lb. white cardstock (using an alcohol friendly black ink - such as Scrapbook.com's Hybrid black) and colored with my Spectrum Noir Alcohol markers. I colored a bunch, for I sell my cards at my daughter's shop in Wake Forest, NC at The Cotton Company. So when I color and design a card, I usually make several. Be sure to check the Angel Policy of any company that you use, if you make cards to sell. Most are fine with a limited amount, as long as they are created by hand, but I have found a few that do not allow cards to be made for sale. If you check their website, usually at the very bottom, you will find the link to the Angel Policy.

The snowflakes are from Jillian Vance's Delicate Snowflake die set cut with my Big Shot using Neenah 110 lb. white cardstock, really my go-to paper. These snowflakes are just beautiful and the inside parts can be left in or punched out. You can see on the card, the bottom left snowflake, I left the centers in with the fine details.

The background was made also with Neenah, but die cut with a Spellbinders Fancy Edged Rectangle. I really like not only the scallops, but if you look closely there are tiny dots (like stitching with no thread) all around the border.

The sentiment from MFT's Hug in a Mug was white heat embossed on Lawn Fawn's Black Licorice cardstock using Nuvo's Detailed Embossing Powder in Glacial White.

The inside sentiment is from Scrapbook.com's Holly Jolly Sentiments stamped on a Taylored Expressions's card base. I think I've used this set on every card I have made this season. So many different fonts and sentiments! I want to use that little reindeer head in a future card. So cute!


Well, as always, thank you for taking the time to read my ramblings and if you are interested in any of the products mentioned, the links are below. Happy crafting!
Some of the links in this post are affiliate links. This means if you click on the link and purchase the item, I will receive a small affiliate commission at no extra cost to you. All opinions remain my own.


*Some

Sunday, October 13, 2019

Gnomes for Christmas with FMS #406


Hi friends! It's been a little while since I posted. We had a fun family vacation in Charleston, SC and family in town for a few days. Whew! It's been a whirlwind.

I wanted to play along with the Freshly Made Sketches challenge this week:
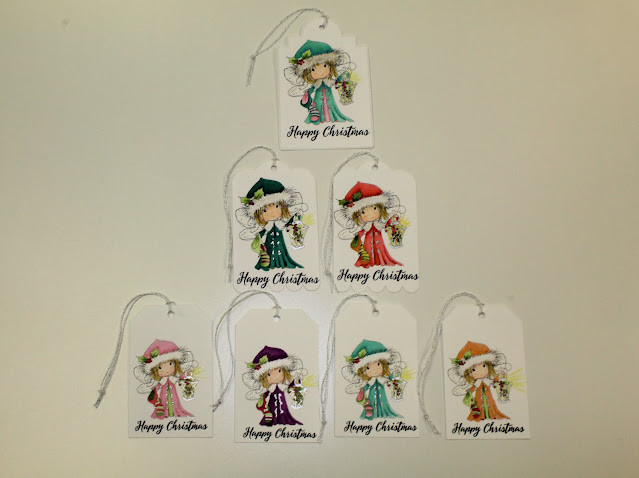
I had previously colored some of these cute gnomies with my Spectrum Noir Alcohol markers and thought they'd be perfect for this sketch.
As I've talked about in previous blogs, I often sit and color at night while watching TV with hubby. After I colored all the gnomies and flowers, I used my Brother Scan 'n Cut to cut them out. If you dislike fussy cutting and want to save on purchasing matching die cuts, you'll love the Scan 'n Cut. Beside cutting out all the detailed images you have, you can also set the width of the border around the image. If you notice I have a small white border, all nice and even, around all the images.
To make the card, I used My Favorite Things Coral Crush card stock and sponged snow on the front. I used the Snowfall Stencil, also from MFT with Scrapbook.com's new ink blending tool.
The smallest pack comes with 2 handles and 5 domed foam covers that adhere with velcro for $5.49. They work really well and I like the smooth foam with no edges. I think this tool will get a lot of use!

To create the snow I used Scrapbook.com's Premium White ink. So nice and juicy - it created snow in a flash.
I cut a piece of Neenah White and ran it through my Big Shot with Pretty Pink Posh's Scallop frame using the magnetic platform. Next, I used these 2 die cut pieces and again ran them through the Big Shot again. This time I used the regular platform with Trinity Stamps' Diagonal Stripe Embossing Folder. The resulting pieces I glued to the front of the card with Tombow Liquid Adhesive for some nice texture.

The Gnomies & Flower were popped up with foam dimensional adhesive and the outside was finished with Trinity Stamps' Cave Crystals adhered with Gina K Connect glue. I wish I could capture their cool iridescence. 

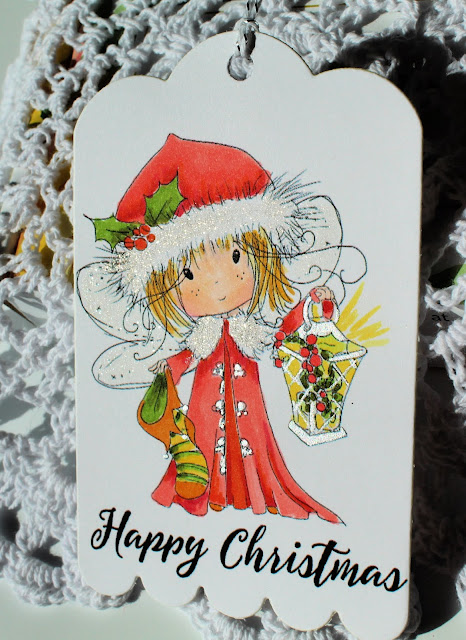
The sentiment on the front is from Scrapbook.com's Holly Jolly Sentiment stamp set. This set is a clear photopolymer set with 30 different stamps, including a little reindeer and a few snowflakes! I had not used a Scrapbook.com's stamp set before and was really pleased with the results. Sometimes with photopolymer stamps you have to prime them, but in this case I did not! It stamped beautifully the first time. For $17.99 I think you have all the different Christmas sentiments that you would need. Large, small, typewriter font, cursive, bold, etc. All fun!
Finally the inside was finished with the "Gnome for the Holidays" sentiment from the Stampendous Holiday Gnomes set. One more little guy was glued down next to it.
Well, one more card for Christmas! Yah! I do think I will make more with the cute Gnomies!

Thank you for visiting my blog today and I appreciate you sticking to the end. If you are interested in any of the products mentioned in this blog, the links are below:
*Some of the links in this post are affiliate links. This means if you click on the link and purchase the item, I will receive a small affiliate commission at no extra cost to you. All opinions remain my own.

Sunday, September 29, 2019

Freshly Made Sketches #404 Challenge

 
Welcome back, friends! It's been a little while since I posted and you may notice a few changes on my blog. I am no longer with Stampin' Up! simply because I wanted to branch out and discover more products, mediums and stamp companies. Stampin' Up! is, and will continue to be, in my opinion, a wonderful, creative, supportive company.

I've reached out to a few companies and they graciously allow me to be an affliate. This means that I will receive a slight compensation if you click on any of the links below and purchase from the shop. Most of the shops are small businesses and this helps drive business to their shops. If you look at my tab at the top "Affliate Sponsers" I've listed the companies with which I am working.

But enough about that, let's look at the card for the challenge. Here is the sketch from Freshly Made Sketches #404:
I had previously colored all the cut little images from the My Favorite Things, Snow Special stamp set. They are just darling! I used my Spectrum Noir alcohol Markers and a silver gel pen to add a few details to the images. They have a matching die set so that made the cutting easy.
Next I used this Stampendous Cling Winter Blizzard stamp in my MISTI. The is a 6 X 6 set which has a snowflake that pops out to give you flexibility in design. I used Distress Oxide Cracked Pistachio to stamp the image a few times to get a nice clear image. I used Neenhah 100 lb. paper.
Next I ink-blended with both Distress Oxide and regular Distress Cracked Pistachio ink so that the image would stand out from the background. The background was die cut with Pretty Pink Posh's Scallop frame. I popped up the outside frame with 3M double sided foam tape and the center panel was adhered with Tombow Liquid adhesive.

Our little penquin was glued with Tombow Liquid Adhesive to an oval die cut out of Neenah Classic Crest 80lb card stock using the Fun Stamper Journey Ovals. These ovals have layers so that you can cut just an oval or an oval with a dotted edge. I did a little stamp surgery for the sentiment from Snow Special. Instead of "Let's Chill Out Together" I cut it to read "Let's Chill". Doesn't hurt the stamp and it's easy to put back together in case I want the whole sentiment at some time.
The inside sentiment is from Pink and Main's Hummingbird set. I thought it was just perfect for this card. A little girl penquin was adhered on the inside with Tombow. Cutie Patoodie!

The card base is My Favorite Things Black Licorice card stock. A beautiful quality and scores and folds beautifully.

I used a few clear bubbles from my stock to finish the card.

Thank you so much for visiting my blog and I hope you enjoyed this card and maybe got inspired to create your own card!

*Some of the links in this post are affiliate links. This means if you click on the link and purchase the item, I will receive an affiliate commission at no extra cost to you. All opinions remain my own.


Wednesday, June 5, 2019

As You See it - Challenge #201 with Free As A Bird


Welcome to my blog post for As You See It - Challenge #201:
I have been having some fun with the new Free As A Bird stamp set by Stampin' Up! and thought I'd create a card with this layout roughly in mind.
Pastel colors are hard to capture in pictures, but this new Balmy Blue color is a really pretty blue. The A2 size card base is made from my new stash of Balmy Blue card stock and I used the ribbon die from Arts & Crafts to have a unique edge at the bottom of the front. 

The background is Whisper White Thick with white embossing paste which has been tinted with Balmy Blue refill ink. Using a palette knife I mixed the embossing paste and a drop or two of the the Balmy Blue reinker with a palette knife on a Silicone Craft Sheet. I spread the paste through one of the stencils from the Pattern Party Decorative Masks (set of 4 different patterns) using the same pallete knife. It's like frosting a cake! Let completely dry.

The bird was stamped on Whisper White Thick with Memento Black ink because I planned to color with Stampin' Blends (alcohol markers) and that ink will not bleed. I used a variety of blues, yellows and a touch of orange and grey of the Stampin' Blends listed below. Just remember, when using the alcohol markers, color inside the the line with a light touch in a skipping pattern so that you always leave white. White is the sparkle that makes the image jump out and gives it life. Alcohol markers bleed, so don't color right up to the line, for it will bleed over the line.
I made my own striped paper with the stripes from Gallery Grunge stamp set and Memento Black ink. The sentiment was stamped and die cut with the new coordinating Stitched Nested Labels. There is a perfect size for everything!

A few Frosted Epoxy Droplits finished off the card.  Always need some "bells & whistles"!

I hope you enjoyed this short tutorial. If you need any supplies and a new annual Stampin' Up catalog, I would be pleased to help you.

Thanks for sticking to the end and here are the links directly to my Stampin' Up! shop:
Product List

Categories

#simplestamping (4) Anniversary (3) Back on Your Feet (3) Beach (10) Believe You Can (3) Birds of a Feather (2) Birthday (26) Black & White (5) Bokeh (2) Buffalo Check (2) Butterfly Gala (2) CAS (34) CAS Christmas (12) CAS Stencil (4) CAS Watercolor (14) CI#48 (2) Cake (3) Christmas (19) Color Throwdown (15) Colour Inkspiration. ink blending (3) Crafting Forever (2) DSP (2) Disney (1) Embossing Folder (14) Embossing Paste (7) Encouragement (10) Father's Day (7) Flowers (10) Free As A Bird (3) Freezer Paper (2) Freshly Made Sketches 366 (2) Get Well (4) Guest Designer (6) Halloween (8) Ink Blending (120) Ink Smooshing (3) International Highlights (1) Kylie (2) Kylie's International Blog (2) Lace (3) Laura Bassen (1) Lots of Cheer (2) Lovely as a Tree (2) Mother's Day (2) NC demos (2) New home (3) Notes of Kindness (2) Ornament (1) Pigment Sprinkles (6) Repeat Stamping (2) Reverse Technique (2) Rooster (1) Rose (3) SSC197 (2) Shaker card (2) Sheet Music (4) Snowflakes (2) Stamp 'n Blends (2) Stampin' Blends (5) Stampin' Up! (5) Stencil (31) Sweet Friend (3) Swirly Bird (2) Thank you (17) Thanksgiving (6) Top Ten (2) Treat Holder (1) Valentines Day (1) Watercolor (169) Watercoloring (31) Wedding (6) Winners (2) abstract (2) alcohol markers (11) baby (6) balloons (10) birthday card (22) blog hop (2) butterflies (13) card challenge (15) clean and simple (3) deer (3) dog (8) embossing (10) featured (2) kylie bertucci (5) large alphabet (2) masculine (11) masculine card (6) masking (9) rainbow (5) shaving cream (4) sketch challenge (7) small stamps (2) stars (4) step technique (1) sympathy (10) tea (5) typewriter (2)

Popular Posts